Building a Simple Webhook Server
A short guide to building a webhook server using Bun. Includes an example for Zendesk.
Thu Oct 16 2025 - 7 min read
INFO
Intro
A webhook server is a very useful tool to have. They enable a large variety of custom implementations from small extensions and workarounds to native functionality to serving as the backbone for entire custom integrations. This is a basic example to get you up and running in a short amount of time, but it can be improved upon and extended further as needed for more complex solutions.
There is a fully open-source repo available on GitHub that I will maintain and improve over time. Feel free to contribute!
Step 1 - Preparation
For this implementation you will need to have the following:
- A JS Runtime to run the code, I recommend Bun
- A code editor, I recommend VS Code
- A way to expose localhost, I recommend Cloudflared
- Admin access to a Zendesk sandbox instance for testing.
- Not required, but I also recommend the REST Client extension in VS Code
Step 2 - Setting up the Server
Create a new Bun project with bun init, a blank project is fine.
Your ‘package.json’ file will usually not include any scripts by default. We will use the following:
"scripts": {
"dev": "bun --watch run index.ts",
"start": "bun run index.ts",
"tunnel": "cloudflared tunnel --url http://localhost:3000"
},
Replace the default code in your ‘index.ts’ file with this:
const server = Bun.serve({
    port: 3000,
    routes: {
        "/webhooks/zendesk/create": async (req) => {
            return new Response(null, {status: 200})
        }
    }
})

console.log(`Server Running at ${server.url}`)
Now you can simply run bun dev to start up the server. It doesn’t really do much at the moment but we will work on that soon.
TIP
Step 3 - Exposing localhost
The first problem we will run into is that nothing outside of our local network will be able to access the server.
During development we will use a tunneling tool to expose our localhost and allow access from outside sources.
CAUTION
If you are using the recommended tools and you added the commands to your ‘package.json’ from above, you should be able to simply run bun tunnel to start it up.
Make sure you copy the URL that cloudflared gives you and store it somewhere, I usually put it in the ‘requests.http’ file I mentioned earlier. If you restart the tunnel at any time, you will need to copy the new URL each time and also be sure to update it in any systems that you are developing with.

Step 4 - Zendesk Webhook
Now that we have our server running and localhost is exposed and accessible, we can start testing with webhooks.
In Zendesk Admin Center go to the “Apps and integrations” section and then “Webhooks”
- Click “Create Webhook”
- In the dropdown for Zendesk Events, choose “Ticket created”
- Click “Next”
- Give it a recognizable name like “Ticket Created”
- The Endpoint URL will be your cloudflared URL + the path in our ‘index.ts’ file.
- Something like
https://your-cloudflared-url.com/webhooks/zendesk/create
- Something like
- Click “Test Webhook”
- In the new window, click “Send Test”
- Keep this page open for now as we will have more configuration to do before we finalize this webhook.
Step 5 - Authenticating to your Server
If your test above was successful, the next thing we will want to do is secure our server. We don’t want just anybody or any system to be able to send events to our system.
To begin, update the request handler in our ‘index.ts’ file to look as follows:
"/webhooks/zendesk/create": async (req) => {
    const headers = req.headers;
    const token = headers.get('x-webhook-token')

    if (token && token === 'some-random-token') {
        return new Response(null, {status: 200})
    } else {
        return new Response(null, {status: 401})
    }
}
Now if you send a test to your server from Zendesk, you should receive a 401 “Unauthorized” error instead of the 200 “OK” that we got before.
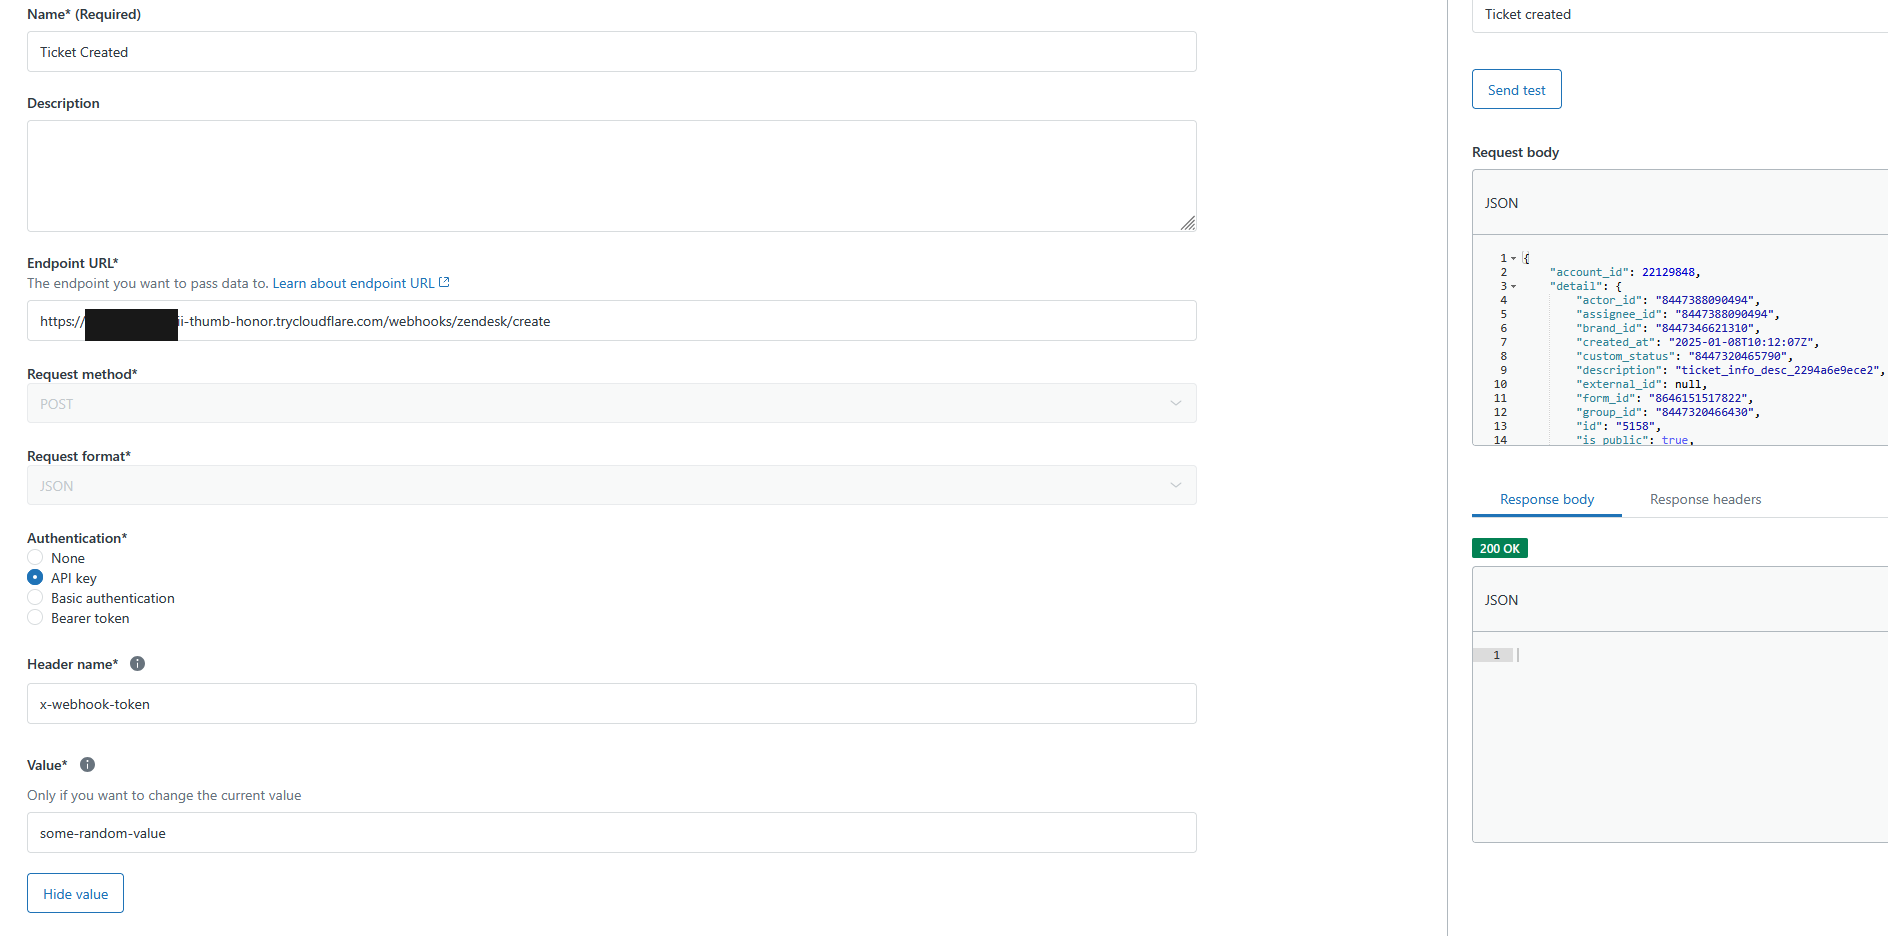
Back in Zendesk under the “Authentication” section of our webhook configuration, select “API Token”
- In the box for “Header name” enter
x-webhook-token - In the box for “Value” enter
some-random-token
CAUTION
Once you have those values added, you should be able to send another test and this time receive the successful 200 “OK” response again in Zendesk.
Your final configuration should look something like this:

Step 6 - Connecting to Zendesk API
Most of the time webhooks will not just be receiving notifications of events but will need to take some action as well. For this example we will simply use the Zendesk API to add an internal note to the newly created ticket.
When it comes to “secret” values like our own webhook token from the previous step and any kind of API credentials, it is always best to keep them in a secure location instead of coded directly into your application. So the first thing we are going to do is setup Environment Variables via Bun.
Create a new file in the root of the project “.env” and add the following to it:
WEBHOOK_TOKEN=some-random-token
ZENDESK_SUBDOMAIN=
ZENDESK_EMAIL=
ZENDESK_TOKEN=- AUTH_TOKEN
- Use any random string or generate a token that will be used to authenticate the sending system to your server
- ZENDESK_SUBDOMAIN
- Your zendesk instances subdomain
- ZENDESK_EMAIL
- The email address of the user to authenticate as when interacting with the Zendesk API
- This will usually need to be a user with Admin permissions and I recommend it being a “system” user, not a personal profile
- ZENDESK_TOKEN
- A generated API token from the Zendesk Admin Center
CAUTION
Now we will make the following changes to our code in ‘index.ts’:
- Top of File - Load our Environment Variables
const authToken = Bun.env.AUTH_TOKEN

const zendeskCredentials = {
    subdomain: Bun.env.ZENDESK_SUBDOMAIN,
    email: Bun.env.ZENDESK_EMAIL,
    token: Bun.env.ZENDESK_TOKEN
}- Route Handler - Replace the hardcoded token value with the variable name
"/webhooks/zendesk/create": async (req) => {
    const headers = req.headers;
    const token = headers.get('x-webhook-token')

    if (token && token === authToken) {
        return new Response(null, {status: 200})
    } else {
        return new Response(null, {status: 401})
    }
}
With these changes made we now have all of our sensitive data stored in a safe location.
Step 7 - Sending the Update to Zendesk
The final step for this post will be finally taking action on the event we received and sending an update back to Zendesk.
We will make use of the credentials from our ‘.env’ file, and the ticket details coming from the Zendesk notification:
if (token && token === authToken) {
    // Reference https://developer.zendesk.com/api-reference/ticketing/tickets/tickets/#update-ticket for details
    const update = await fetch(`https://${zendeskCredentials.subdomain}.zendesk.com/api/v2/tickets/${body.detail.id}`, {
        method: 'PUT',
        headers: {
            "Content-Type": "application/json",
            "Authorization": `Basic ${btoa(`${zendeskCredentials.email}/token:${zendeskCredentials.token}`)}`
        },
        body: JSON.stringify({
            ticket: {
                comment: {
                    public: false,
                    body: "Update from Webhook!"
                }
            }
        })
    })

    return new Response(null, { status: 200 })
} else {
    return new Response(null, { status: 401 })
}
With this code added to our route handler, we make an HTTP PUT request back to the Zendesk API, providing our stored credentials, and sending the update details we’d like to add to the ticket.
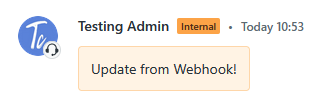
If everything works correctly, you should be able to save your webhook, create a new ticket to test with, and see an update like this:

Conclusion
While this is a pretty basic implementation, it is a good starting point to building a server like this. These same concepts can be re-used to add additional webhook handlers, API routes if you want to build your own API, and more complex processes like full scale integrations that might include syncing data across platforms.
Once you have the functionality working how you’d like, the final step is deployment. There are a large variety of platforms you can deploy projects like this to, all of them do mostly the same things. I personally try to self-host with a VPS but popular platforms like AWS, Heroku, Render, etc. are all fine as well. Make sure you properly configure your Environment Variables in whichever system you choose.
You can find the full project files for this post on GitHub:
